Egnyte incorporates innovative strategies to harness Generative AI’s full potential while safeguarding its customer’s proprietary data and aligning with specific business processes and goals.
Egnyte’s AI Assistant is an AI-powered conversational interface grounded in the company’s data.
Users can choose any of the prompts or recommended questions, use audio input or type in their question in the input bar on Egnyte’s AI Assistant. They can regenerate responses, verify answers, provide feedback, and view the chat history.
Users can leverage Egnyte’s AI Assistant to connect to external connectors such as Atlassian, Gmail, Procore, and others. The Admins can configure the required AI connectors for their users.
Skip to...
Use Egnyte’s AI Assistant
From Any Page on Egnyte Web UI
Accessing Egnyte’s AI Assistant from Left Hand Menu
Document Preview
Q&A on Egnyte's AI Assistant
Select Scope and Web Search
Multi-File Ask
Multi-File Ask on Search Results
Upload Files
Natural Language File Search
Document Creation
Tag Agent, Connectors, and Files & Folders to Get Responses
AI Personalization
Use Prompts
Verify Answers
Copy Text
Share Chat
Save Response
Download
Regenerate Response
Edit a Prompt
Search Chats
New Chat
Chat History
Renaming a Record
Deleting a Record
Pin or Unpin a Conversation
Feedback Options
Scheduled Tasks
Ensuring Information Safety
Switch Between Egnyte’s AI Assistant and Agents
Model Settings
Additional Resources
Use Egnyte’s AI Assistant
From Any Page on Egnyte Web UI
- Navigate to Files or any specific folder.
- Click on the Egnyte’s AI Assistant icon.
- When the user opens Egnyte’s AI Assistant from the side panel while browsing a folder, that folder is automatically selected as the source context. This means their queries will prioritize content from files within that folder.
Accessing Egnyte’s AI Assistant from Left Hand Menu
The auto-scoping is applicable only on launching Egnyte’s AI Assistant from within a folder view. When accessing Egnyte's AI Assistant from the AI option in the left menu or other entry points, the default All Sources behavior applies.
- Navigate to Collaborate -> AI
- Egnyte’s AI Assistant will be available for the users to interact with it.
Document Preview
The auto-scoping is also applicable when opening a document in preview. The scope is automatically set to the document that the user opens in preview. The user can continue their interaction on the document in Egnyte’s AI Assistant.
Q&A on Egnyte’s AI Assistant
Users can ask questions on Egnyte’s AI Assistant and get a response based on their queries. They can either select any of the prompts or recommended questions to ask query. Alternatively, they can use audio input or type the question to get a response.
Asking brief and specific questions generates the best answers. Multipart questions, when asked separately, generate better answers.
Users can also find specific files or folders within Egnyte’s AI Assistant. Responses to their queries may include relevant files or folders, depending on the nature of the question.
Users can also choose from multiple AI models directly within the chat input box in Egnyte.
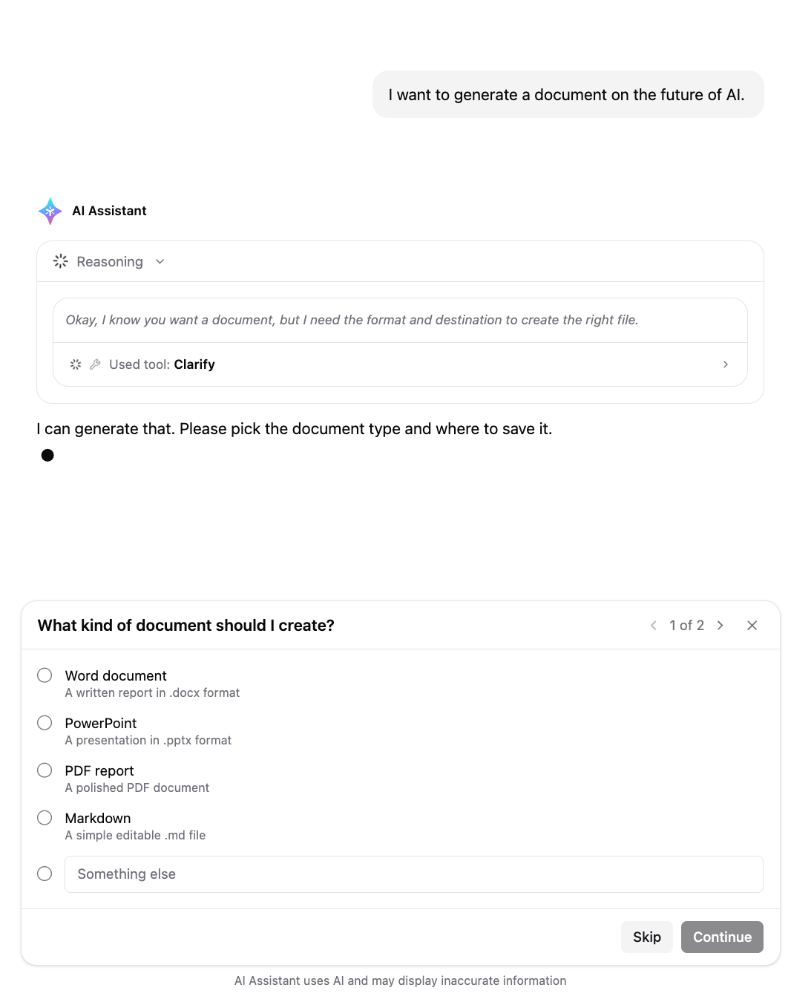
AI Assistant asks for clarification before proceeding if the query entered by the user is not clear or too broad. This eliminates the need for excessive re-prompting for the users and provides them with clearer and accurate response. Users can always choose to Skip the questions, if asked or provide their response and Continue.
Select Scope and Web Search
Users can enable or disable the sources using the + icon or by clicking on the source(s) in the input box.
- Click on the + icon
- Use the toggle for Egnyte (enabled by default) and Web (disabled by default) to enable or disable.
As soon as the user enables Egnyte and web search, the sources will show up in the scope. Users can choose to add specific Egnyte and Web source(s). - Click on the Egnyte source or + icon -> Egnyte -> to set the scope for Egnyte sources
- Click on Add files & folders
- Select the desired file(s), folder(s), and click on Continue.
- The selected source(s) will appear. Users can continue to modify by adding or removing the required items for the scope.
Users can currently select and add up to 20 items as the source for Egnyte’s AI Assistant.
- If web search is enabled, click on All sources or click on the + icon -> Web
- Enter the web address and click on + Add to add the web source(s)
- Users can hover over a web source added and click on x to remove the sources. They can also click on Clear all to remove all the added web sources.
Users can also click on the Settings icon and click on Egnyte files and/or Web Search and manage the scope.
The Web Search preference selected by users is remembered across new chats, so users do not need to enable Web Search each time a new chat is started. However, when the users sign in from a new browser session or device, Web Search remains disabled by default, ensuring that the preference is explicitly selected for the new session.
Multi-File Ask
Users can select up to 20 files and/or folders and interact with Egnyte’s AI Assistant based on their selections.
The users can also select the desired items and click on Open AI Assistant from the context menu to begin their interaction based on the selected items.
If a user is already interacting with Egnyte’s AI Assistant and selects specific file(s) or folder(s) during the conversation, they will see the new source(s) displayed in the input box.
Multi-File Ask on Search Results
The users can interact with Egnyte’s AI Assistant on the selected files based on their search results. This enables faster access to relevant content and enhances productivity by allowing users to extract insights, summarize, or take actions on multiple files simultaneously.
Upload Files
Users can also upload the file(s) from their system and refer to these uploads in their prompts.
Click on Upload files and select the file(s) to upload. Users can also drag, drop or paste the files.
The selected files will be saved in the user’s private folder at /Private/<username>/AI Uploads. These files are automatically tagged with the Content Source: AI Upload tag under ai content section.
Users can upload a maximum of 20 files in a single prompt.
Natural Language File Search
Users can also use Egnyte’s AI Assistant to carry out natural language searches for file metadata. They can add filters in the query for:
- File Type (for example, find word docs, show me latest ppts)
- User Name (for example, what did John modify)
- Modified Date (for example, updates from last week, modified in the last month)
- Upload Date (for example, files uploaded last week)
Document Creation
Egnyte’s AI Assistant provides users with the ability to create properly formatted documents from scratch. They can also convert these documents from one to another supported formats.
- Enter the prompt for the AI Assistant to create the requested document.
- The document will be generated providing the user to review the same in quick view. The document generated will be fully formatted with an apt title provided to the file.
- Users can also convert the document generated in any other supported format, as needed.
The following file types are currently supported:- Word docs (.docx)
- PowerPoint presentations (.pptx)
- PDFs (.pdf)
- Excel Spreadsheets (.xlsx)
- HTML pages
- Markdown files
Tag Agent, Connectors, and Files & Folders to Get Responses
Users can type @ in the input box to tag a specific Agents, Connectors, or Files & folders.
For instance, click on Agents and select the desired agent. Users can also click on More, select the desired agent, and click on Insert.
The agent will be tagged and can be used while interacting with AI Assistant.
Users can invoke one agent in a single prompt. The Agents option will be disabled if the user has tagged a specific agent.
Similarly, users can tag the desired AI connectors and can ask questions based on a specific file and receive a response.
- Users can select a maximum of 20 files & folders to ask questions based on their selection.
- Enter at least 3 characters to begin searching for a particular file or folder.
Egnyte tools can also be used while interacting with AI Assistant. The tools are available within Connectors and can be enabled or disabled as needed.
Admins can enter the prompt and AI will ask for permissions as per the configured tool setting.
Currently, Egnyte tools are available to domain administrators only. Users who are not domain administrators will not see the File and Folder Tools connector and cannot use these tools in AI Assistant or in Agents.
AI Personalization
Agents can personalize responses using data and memories based on configured settings. Admins can also set up a corporate glossary for AI to refer to the company-specific terminology and definitions.
Agents can automatically learn and add memories from user interactions, refer to past chats, and allow users to add, view, and manage memories.
Use Prompts
Users can view and use prompts in their interaction with Egnyte’s AI Assistant. They can click on the + icon -> Prompts to view and insert prompts from the Prompt Library.
They can click on Insert to use the instruction of the selected prompt in their interaction with Egnyte’s AI Assistant and receive the associated response.
Verify Answers
- Use audio input or type in a question and generate the answer on Egnyte’s AI Assistant.
- Read the response and click on the given source(s) to verify the information presented.
For critical decisions, users are advised to cross-verify answers from original documents. The source(s) are displayed at the bottom of the response.
When users click on these source(s) while accessing AI Assistant from any page in the Web UI, the sources open in Full Preview.
On accessing these source(s) from the AI -> AI Assistant page, they are displayed in Quick View.
Copy Text
Click on the Copy text icon and the response generated by the AI Assistant will be copied to clipboard.
Share Chat
Chats can be shared with any existing users or users that have been selected.
- Click on the share icon at the top or from any of the responses.
Alternatively, click on the History icon -> click on the three-dots icon of a particular conversation, and click on Share option.
- Select Existing Users (default) or Users you choose and enter the user(s). Click on Get share link.
-
The link to the conversation will be copied and the user can share it with the intended recipients.
Source files are referenced but not shared while sharing a conversation. The recipients will see the conversation content only, even if they don’t have access to the files.
The selected users will receive an email informing them about the shared conversation.
When the users click on the link they receive, the same conversation will open up for them to continue interacting with Egnyte’s AI Assistant.
Save Response
- Users can save the response by clicking on the Share dropdown and then selecting Save to Egnyte option.
- Provide a file name and click on Select Folder.
- Select the desired folder location and click on Select.
- Click on Change to reselect the folder location if required. Click on Save.
- The response will be saved to the selected folder location.
Alternatively, the users can choose to download by clicking on the Download option and the response will be downloaded in a Word document on the user's system.
Download
Users can download the response by clicking on Share icon -> Download. The response will be downloaded to the user’s system as a Word document.
Regenerate Response
The user can regenerate the response by clicking on the Regenerate icon.
Edit a Prompt
Users can edit the most recent prompt in the interaction to refine the response generated.
- Click on the Edit icon.
- Edit the prompt and click on Send to get a response as per the edited prompt
Search Chats
Users can search for past chats by clicking on the Search option in the sidebar.
They can enter their search criteria to search for a past chat. Users can also click on New chat to start a new conversation. They can also click on the three-dots icon to Share, Rename, Pin, and Delete a chat.
New Chat
- Click on the New Chat icon at the top and the ongoing chat will be cleared.
Chat History
Chat History of up to 180 days in the past is available in Egnyte’s AI Assistant. The history icon is available at the top.
Conversations get auto-generated and meaningful titles for the users to quickly find them.
To view the Chat History:
- Open Egnyte’s AI Assistant.
- Click on the history icon. The available historical records will show up
- Select the three-dots menu to open various options to manage the selected chat conversation
- All the previous conversations related to that file or folder in scope appear right at the top.
- Click on any of the available chat records to access it in Egnyte’s AI Assistant.
- The chat history will be blank if there are no previous conversations.
Renaming a Record
- Open the Chat history of Egnyte’s AI Assistant.
- Click on the three-dots icon of a particular record and click on the Rename option.
- Enter the new name for the record. If the user tries to save an empty (blank) title, then the record will be auto renamed to Untitled.
Deleting a Record
- Open the Chat history of Egnyte’s AI Assistant.
- Click on the three-dots icon of a particular record and click on the Delete option.
- Click on Delete Permanently to confirm deletion. The record will be removed from the chat history.
Pin or Unpin a Conversation
- Open the Chat history of Egnyte’s AI Assistant.
- Click on the three-dots icon of a particular record and click on the Pin option.
- The pinned conversations will appear at the top.
- Similarly, the option to Unpin the pinned conversation will appear.
Feedback Options
Users can provide feedback on the responses generated in Egnyte’s AI Assistant.
- Click on the thumbs up or thumbs down icon below the response to provide feedback. After every three questions, an explicit feedback option will appear.
-
Users can provide additional comments after clicking on thumbs down. Click Submit after entering the comments. They can also choose to either provide consent (checked by default) or opt out of allowing Egnyte access to the logs.
Scheduled Tasks
Users can write a prompt once and schedule the task for the AI Assistant to run it automatically.
- Navigate to AI -> Scheduled Tasks
- Click on New Task
- Enter the Task details
- Enter the Name for the task
- Provide the Instruction. Users can select the source(s), tag agents, connectors, files and folders, and select the preferred model.
- Select the frequency as daily/weekly/monthly and the time. If the user selects weekly or monthly, they will get an additional option to select the days.
-
Click on Save
The task will be created. The prompt will automatically run at the scheduled time in the user’s local timezone. Each scheduled run will create a record in the conversation history.Users can choose to mark the task as inactive or active using the respective toggle. They can also click on the three-dots menu and choose to Edit, Run now, view History, and Delete the task.
- Only Power Users and Admins can use scheduled tasks. Standard users do not have this capability.
- Each user can have at most 20 active schedules.
- A scheduled run can't answer clarifying questions or sign in to a connector, so a connector must already be authenticated.
Ensuring Information Safety
Egnyte’s AI Assistant strictly maintains user access permissions; it will not unveil answers or information that users lack access to.
Egnyte’s AI Assistant does not consider password protected files and files protected using Microsoft Purview Solution (having restricted, confidential, or other protected labels) to generate responses.
Switch Between Egnyte’s AI Assistant and Agents
The users can easily switch between Egnyte’s AI Assistant and Agents.
- Click on the dropdown at the top and switch between Egnyte’s AI Assistant and Agents.
Model Settings
Admins have the option to choose if the users should be able to select their preferred Large Language Model. Refer to this article for more information.