If you love Storage Sync, try Smart Cache, Egnyte's next-gen hybrid technology. Egnyte has been investing heavily in Smart Cache -- it combines the performance and scalability of Storage Sync with intelligent caching technology, single drive letter, global file locking, and much more. Learn more here.
Storage Sync 12.x needs to be deployed as a new Virtual Machine since we have re-architected the solution on a 64-bit Debian Buster distro package. It will not be possible to perform an in-place upgrade of Storage Sync software from version 11.x to version 12.x.
Storage Sync 12.x for Hyper-V can only be deployed on Windows Server 2016 and 2019 editions. It cannot be deployed on Windows Server 2012 or 2012R2 versions.
What gets Migrated
- System and network settings [Hostname and IP address]
- Cloud admin account settings
- Software update policy
- AD / Egnyte authentication
- Previously synced data
- Sync configuration settings
- User mappings
- Synced folders settings
What does NOT get Migrated
- Local device user credentials
There are two ways to migrate data from the existing Storage Sync version 11.x to 12.x:
There is a possibility that your data disk type is BTRFS, which is not compatible with the new Storage Sync version. To verify, please execute the following command in your VM's console window or via an SSH session:
df -hT
If /egnyte shows EXT3 or XFS as the type, you can migrate the data disk by attaching it to the new Storage Sync VM. Follow the instructions for "Attaching the Existing Data Disk".
If /egnyte shows BTRFS as the type, proceed with "VM to VM Data Copy" and submit a ticket to Egnyte Support.
Attaching the Existing Data Disk
Use this method if you do not have sufficient storage in the ESX data-store to duplicate the Storage Sync dataset.
VM to VM Data Copy
Use this method ONLY if the above method is not feasible.
Use this method if you have sufficient storage to duplicate the dataset.
Use this method if your disk is on btrfs file system
If this method is needed to migrate, reach out to Egnyte Support by submitting a ticket or send an email to support@egnyte.com for assistance.
Attaching the Existing Data Disk for VMware
Attaching the Existing Data Disk for Hyper-V
Attaching the Existing Data Disk for VMware
The 11.x VM has data disk(s) assigned to it that contains synced data as well as Storage Sync configuration data. This procedure involves moving (or cloning) the data disk(s) from the 11.x Storage Sync VM and attaching the virtual disk(s) to the 12.x Storage Sync VM.
- Go to Update in Storage Sync and update to the latest version
- Complete a final sync on the VM.
-
Deploy a new 12.x Storage Sync VM.
DO NOT add a 2nd Virtual Disk! Leave the VM powered off.
- Power down the 11.x Storage Sync VM.
- Remove the data disk from the 11.x Storage Sync VM.
In the vSphere client, click on the 11.X VM and click Edit Settings. Verify that the correct 11.x VM is selected. Find and select Hard Disk 2, the Storage Sync data disk. Ignore Hard Disk 1 as this is the system disk. Click Remove once the appropriated devices(s) have been selected.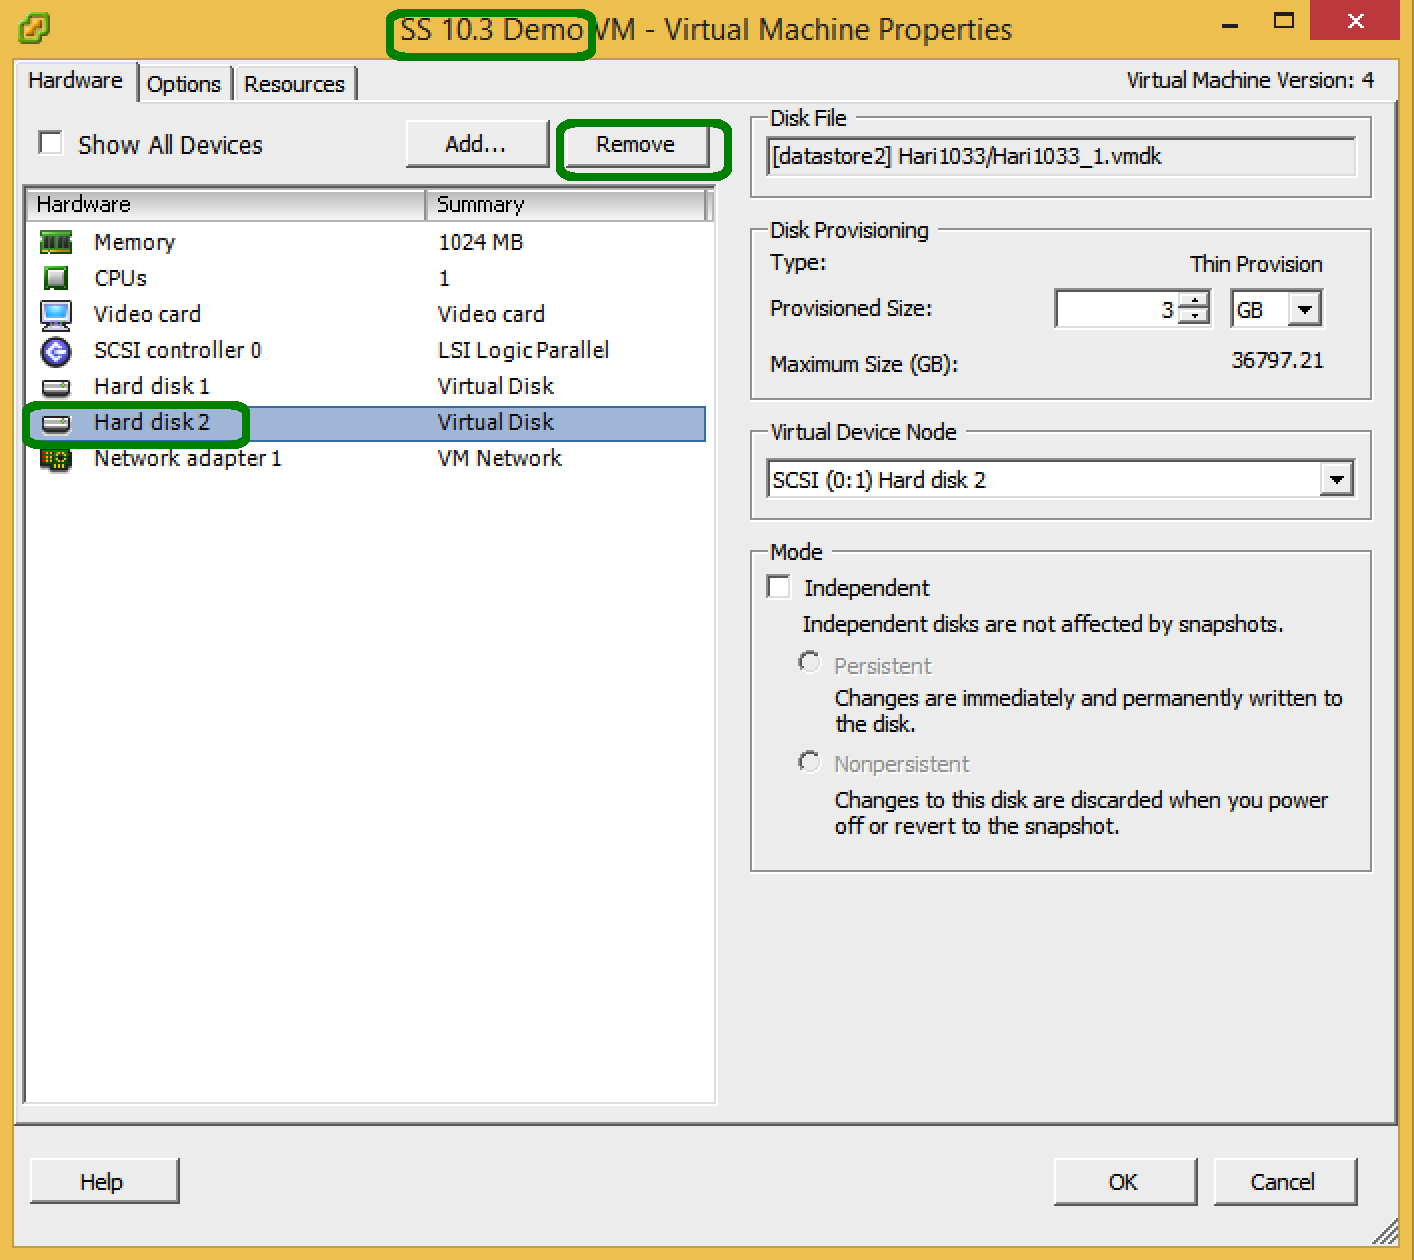
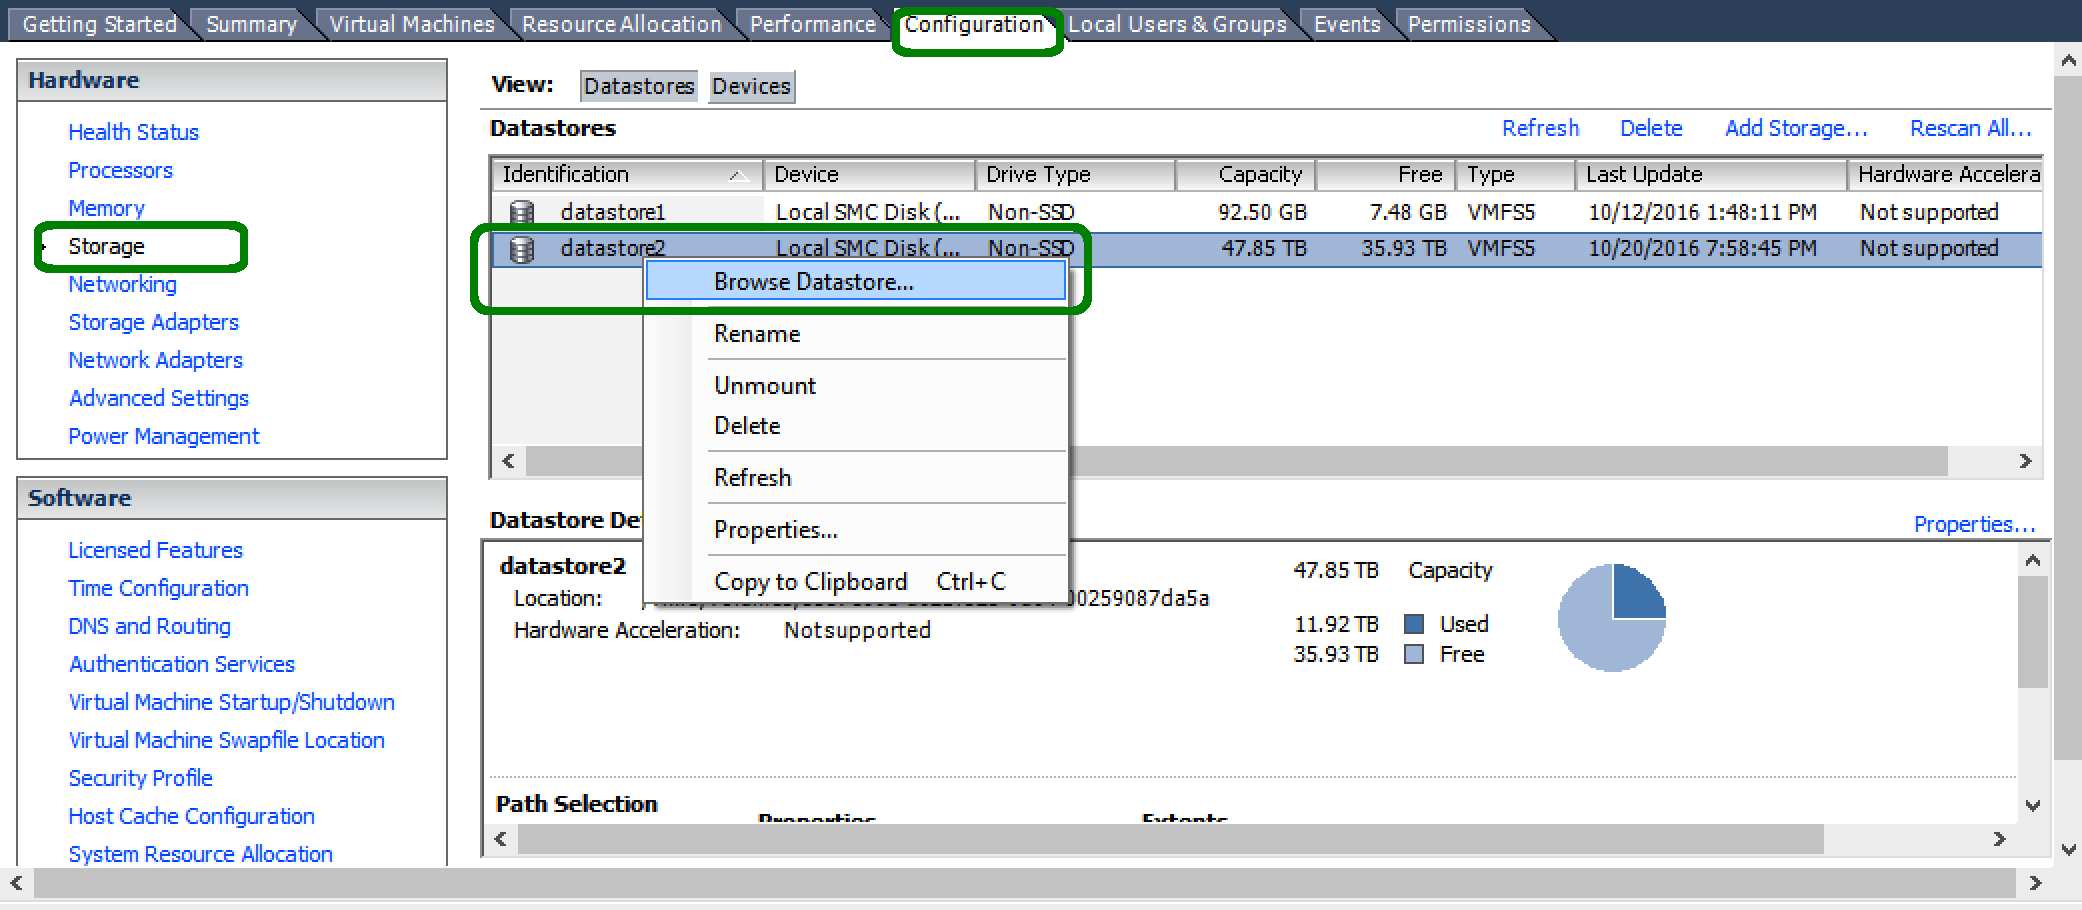
- To move the virtual disk(s) from 11.x to the 12.x folder in the ESX Datastore Browse UI, click on the ESX Server located in the top left corner of the vSphere Client and select the Configuration tab. Then, access the Storage hardware, right click the appropriate datastore and select Browse Datastore.
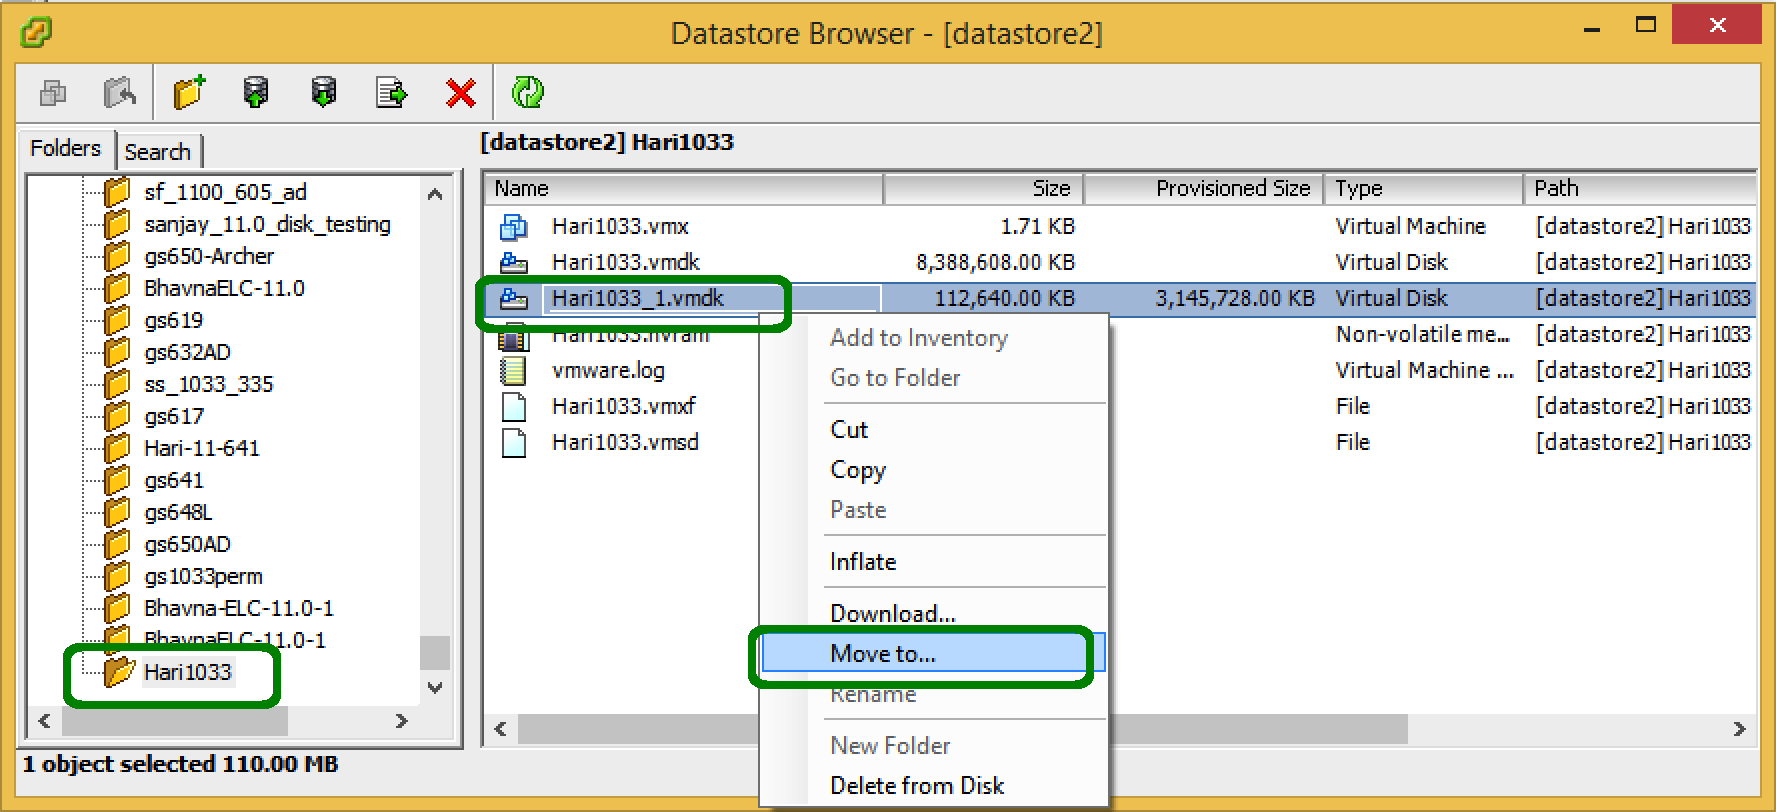
- Locate the 11.x VM folder in the datastore. In this example, the 11.x VM folder is called Hari1033.n The file(s) that need to be moved to the new location are the virtual disk files that we removed in Step 5. In the example, the virtual disk file is called Hari1033_1.vmdk. Right click on the file(s) and select Move to…
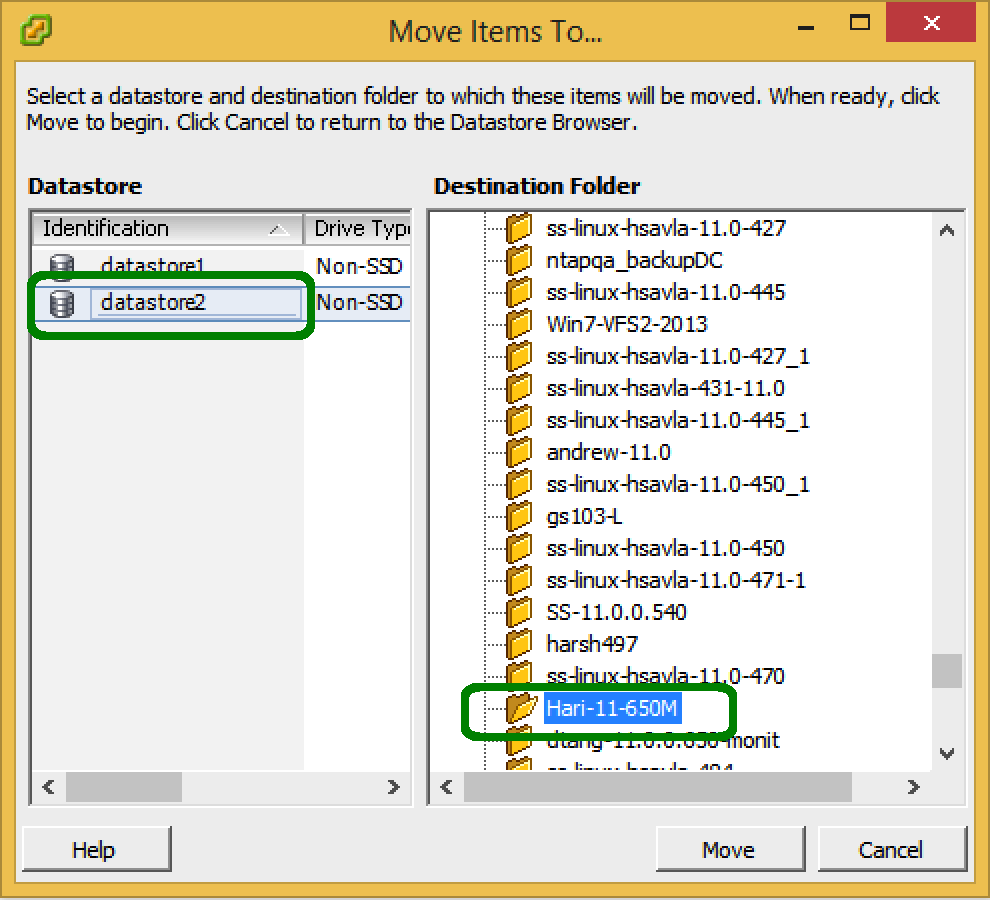
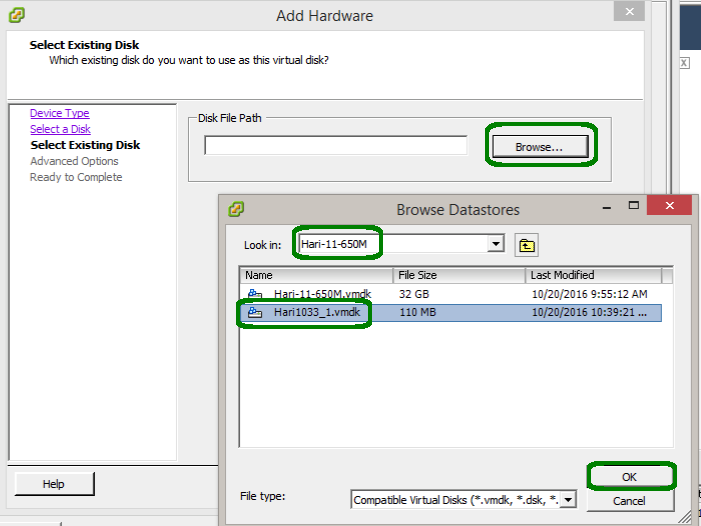
- Select the target location, first by selecting the datastore and the folder that contains the 12.x VM (e.g. Hari-11-650M). Click on Move to place the vmdk file(s) to the new destination.
- Attach the data disk(s) from 11.x to the 12.x Storage Sync VM by clicking on Edit Settings and then Add.
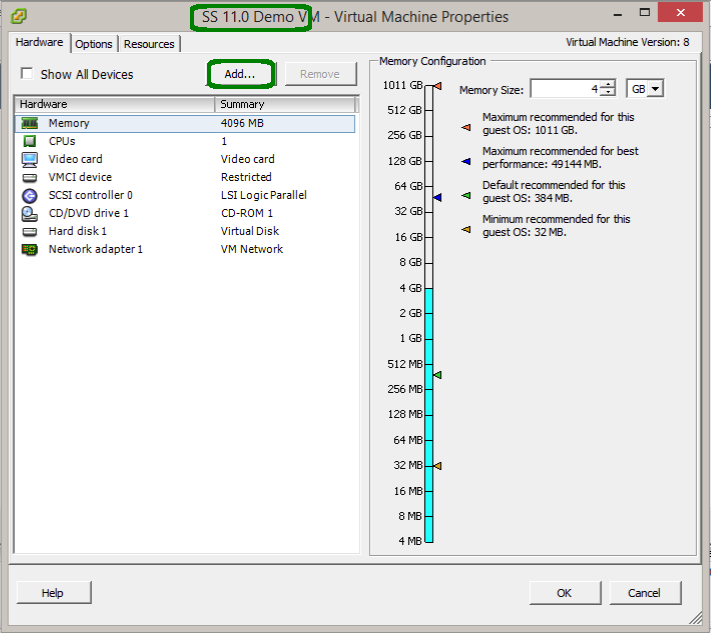
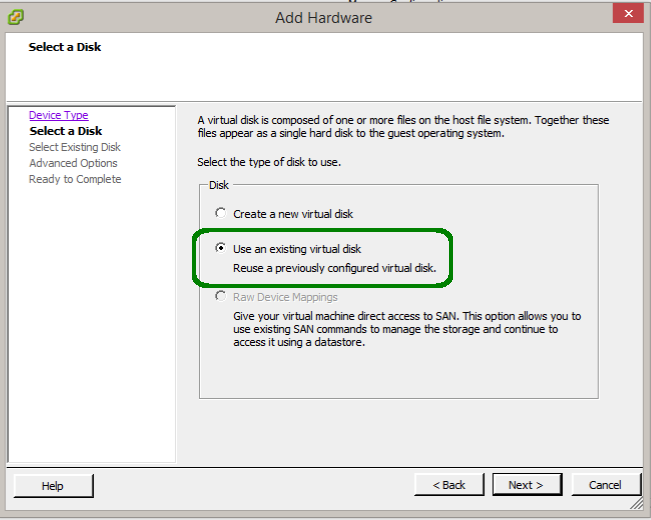
- Select Hard disk, and Use and existing virtual disk – Reuse a previously configured virtual disk.
- Click Browse… and select the appropriate datastore; locate the 11.x VM folder that the virtual disks now reside. Select the _1.vmdk and take the default SCSI settings.
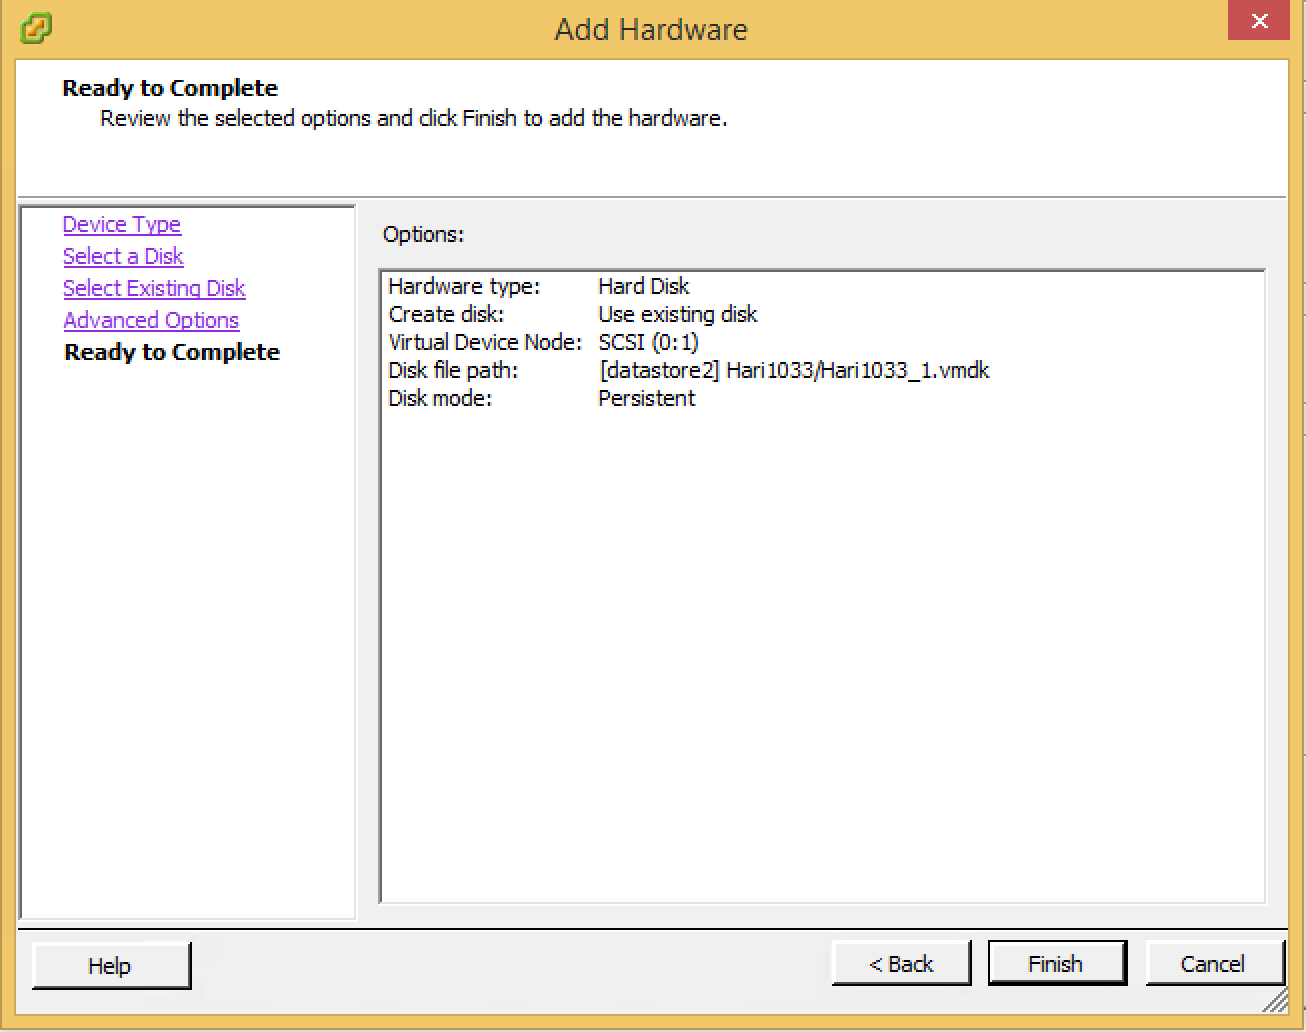
- Click Finish to complete the disk add. Add additional data disks as required.
- Start the 12.x VM.
- If DHCP is enabled, open a web browser and navigate to the IP address and port listed on the console i.e. http://Storage-Sync-IP-Adress:8806
- If DHCP is not enabled, login to the console and set the network settings including static IP via the egnyteservice config menu.
- Login to the VM with egnyteservice user account. (Default password is egnyteelc)
- Access the menu by entering the config command - i.e. sudo /usr/local/bin/egnyte/config_network
- After updating the IP address, restart the networking service using the command - i.e. sudo systemctl restart networking
- Complete the install process.
- If Egnyte Authentication method was selected in the 11.x VM, users will need to update their device passwords.
Attaching the Existing Data Disk for Hyper-V
The 11.x VM has data disk(s) assigned to it that contains synced data as well as Storage Sync configuration data. This procedure involves moving (or cloning) the data disk(s) from the 11.x Storage Sync VM and attaching the virtual disk(s) to the 12.x Storage Sync VM.
- If the existing Storage Sync is not on version 11.x, update the device to version 11.x.
- Complete a final sync on the 11.x VM.
-
Deploy a new 12.x Storage Sync Hyper-V VM.
DO NOT add a 2nd Virtual Disk! Leave the VM powered off.
- Power down the 11.x Storage Sync device.
- Remove the data disk(s) from 11.x Storage Sync VM
In Hyper-V Manager, click on the 11.x VM and then select Settings… Verify that the correct 11.x VM is selected and that the correct Hard Drive is selected. In this example the SCSI Hard Drive called 10-3-hyperv-data1.vhdx is the data disk to be removed. Ignore the system.vhd Hard Drive. Click Remove once the appropriate device(s) have been selected.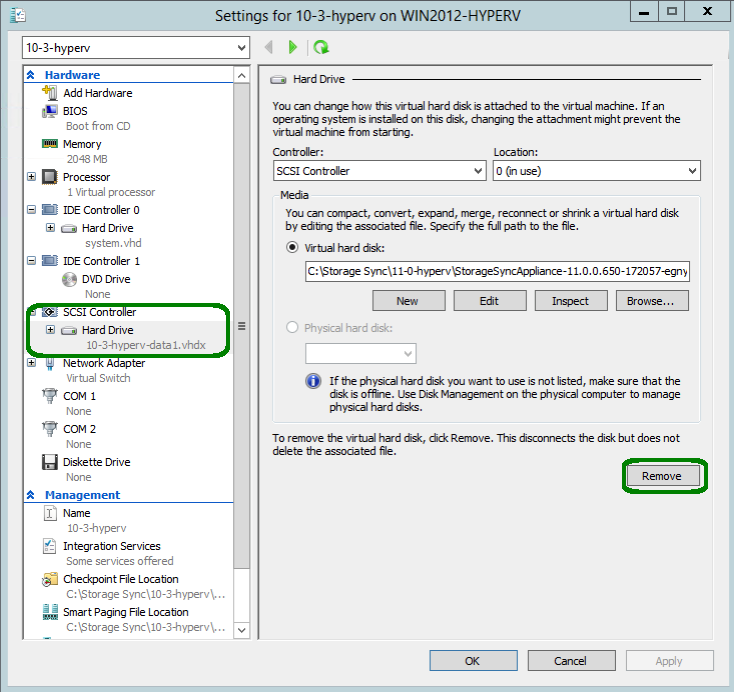
- Confirm the disk has been removed from the Hyper-V VM.
- Move the virtual disk(s) from the 11.x to the 12.x folder on the Hyper-V Manager Host.
Use Windows Explorer to move the location of the data disk(s) to the new virtual disk location for the Storage Sync 12.x VM.
- To attach the data disk to 12.x Storage Sync device, go to the Hyper-V Manager, select the 12.x Storage Sync VM and click on Settings…
-
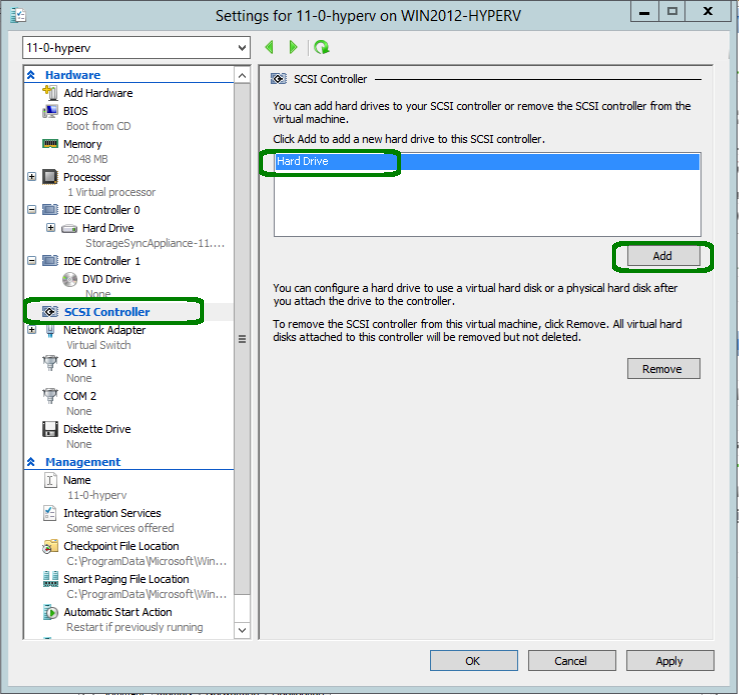
SCSI Controller and Hard Drive should be highlighted if they have not been added yet. Click Add.
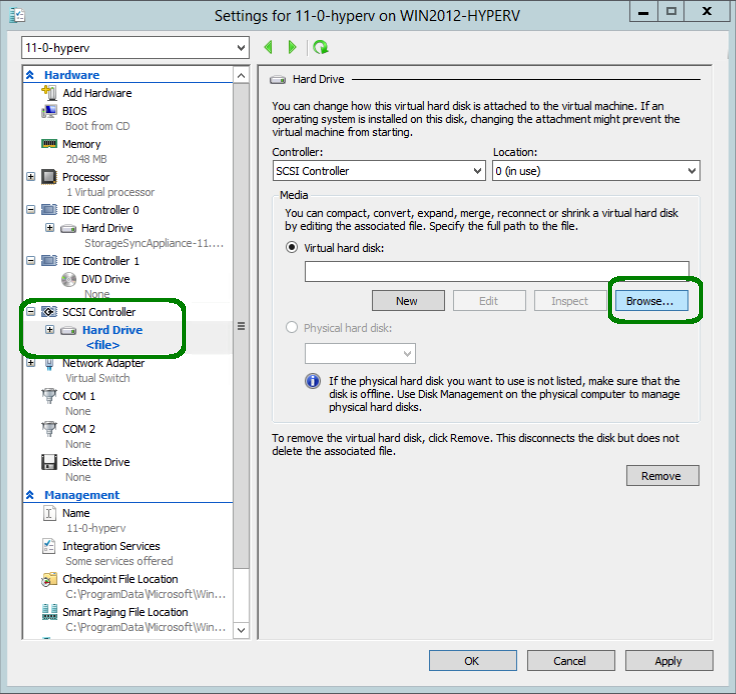
- Select Browse… to add the data disk from the 11.x Storage Sync VM
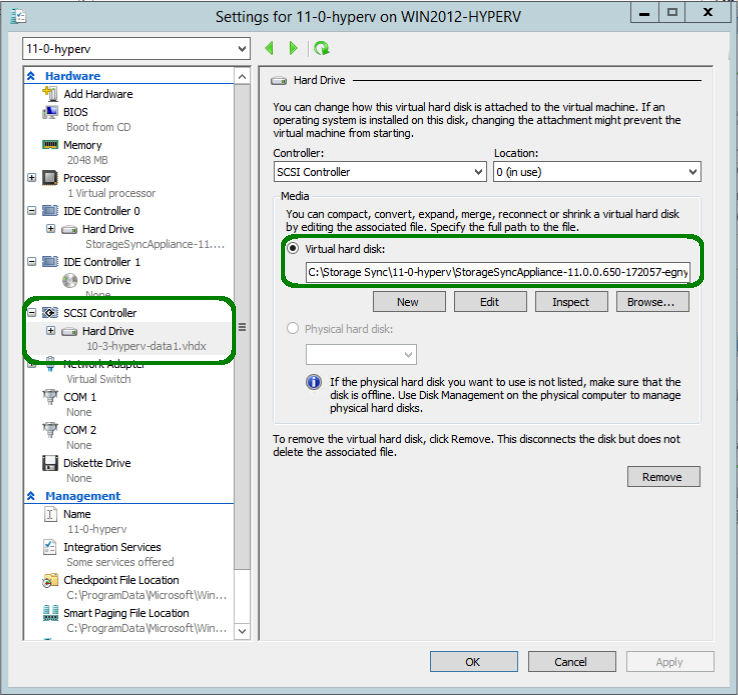
- Confirm that the original data disk has been added to Storage Sync 12.x
- Repeat the process for any additional data disks.
- Start the 12.x VM
- If DHCP is enabled, open a web browser and navigate to the IP address and port listed on the console i.e. http://Storage-Sync-IP-Adress:8806
- If DHCP is not enabled, login to the console and set the network settings including static IP via the egnyteservice config menu.
- Login to the VM with egnyteservice and its credentials egnyteelc
- Access the menu by entering the config command - i.e. > sudo config_network
- Complete the install process.
- If Egnyte Authentication method was selected in the 11.x VM, users will need to update their device passwords.