The Egnyte for Salesforce integration makes it easy to store, access, and share business files from within the Salesforce web interface. Users can add the Egnyte for Salesforce App to Account, Case, Contact, Lead, and Opportunity Page Layouts. They can also add Egnyte for Salesforce to custom object record pages. Follow the steps below to install the latest version.
Prerequisites
Egnyte customers wishing to use the integration:
- Must be using SF Enterprise, or Unlimited editions with at least 2 free permission sets
- Must also purchase licenses for each user that will be using the integration within Salesforce
- Only a Salesforce system administrator may install Egnyte for Salesforce
- During installation, the linked Egnyte domain must be verified using an Egnyte admin account with Egnyte or AD authentication (i.e., an SSO provider may not be used). Also note, Egnyte <-> SF integration is on 1:1 basis only
Upgrading from Previous Versions
Scenario |
Steps |
| Upgrading from 1.x | Install the latest version first (see article), verify it's working, then uninstall/disable 1.x. |
| Upgrading from 2.x or 3.x | Open the Egnyte for Salesforce AppExchange listing and select Get it Now. |
Regardless of version, always install the package for all users in the org, even if only some will use it.
Install and Deploy Egnyte for Salesforce
For testing Egnyte installation and Egnyte features, it is recommended to first install the Egnyte for Salesforce package in a sandbox environment. Admins don’t need to have a paid Egnyte domain to do this. They can easily use the trial Egnyte domain (which they can set up from the Egnyte Domain Configuration).
To provision additional Salesforce licenses or extend a trial Egnyte domain beyond 14 days for continued testing in the Sandbox environment, contact the Customer Success Manager (CSM).
Install the package
- Sign in to Salesforce as a System Administrator.
- Start the installation process from the Egnyte for Salesforce Appexchange listing:
https://appexchange.salesforce.com/listingDetail?listingId=a0N30000000q7EtEAI -
To ensure all users in the organization have the required permissions for the package to work, select the option to Install for All Users.
All users don't need to be licensed Egnyte users, but this will ensure that all users have enough permissions assigned for the app to work as they create and modify Salesforce records.
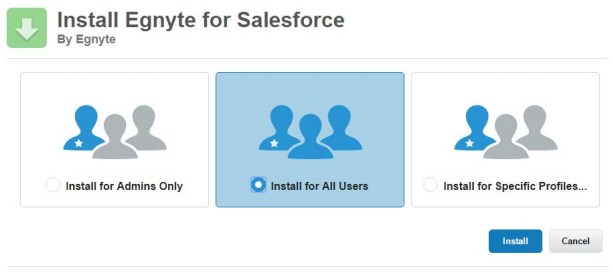
- Click Install to complete the installation process.
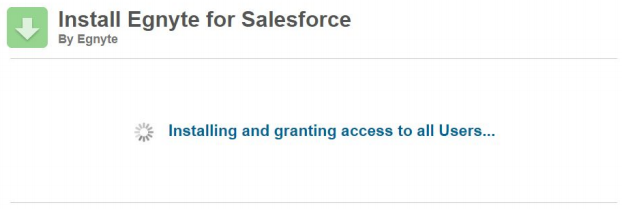
Ensure that permissions are correctly granted
- Use this guide to assign the Egnyte User permission set to every user in the org.
- Pre-approve Egnyte for Salesforce by following the steps in another guide.
- Go to Setup/Profiles, and for each profile, go to Connected App Access and ensure the checkbox Egnyte for Salesforce is checked.
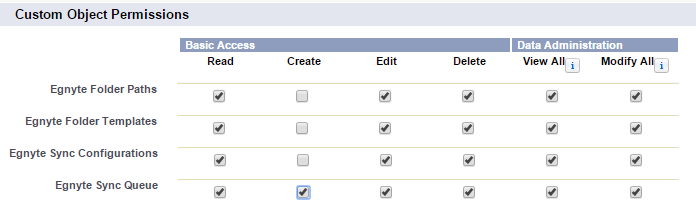
- For custom profiles, go to Setup / Profiles, and edit every custom profile which is in use so that it has at least the following Custom Object Permissions: for Egnyte Sync Configurations, Egnyte Folder Templates, and Egnyte Folder Paths at least View All; for Egnyte Sync Queue, at least Modify All and Create.
Guest/Community Users,and Permissions
Read, Create, and Edit are general object-level permissions, while View All and Modify All apply to specific records. Granting Guest users View All or Modify All on Egnyte for Salesforce objects exposes those records — potentially for editing — to unauthenticated users. Egnyte does not recommend this configuration.
Instead, restrict Guest user access through Salesforce sharing rules so only the necessary records are visible. See the Salesforce guide on guest user sharing for details.
Egnyte permissions are not revoked automatically. If a user's Salesforce record access is removed, an admin must also manually revoke the corresponding folder access in Egnyte.
Example: Configuring Guest User Permissions for a Community
- Go to Setup > All Communities, then select Workspaces for the applicable community.
- Navigate to Administration > Pages > Go to Force.com > Public Access Settings to open the Guest User Profile.
- Under Custom Field-Level Security, locate Egnyte Sync Configuration and select View > Edit.
Integrate with the Egnyte domain
- Once the installation of the Egnyte for Salesforce package is complete, the Egnyte domain can be configured. While the Egnyte integration can be configured to work within Salesforce Lightning, these configuration steps must be done through Classic mode. Start by opening the Egnyte Domain Configuration tab.
- If an Egnyte domain is not available, click Egnyte Trial Domain (shown below) to create a trial domain before proceeding with the remaining steps. Trial domains include five preconfigured integration licenses by default, allowing the integration to be used immediately after installation and configuration are complete.
- If an Egnyte domain is not available, click Egnyte Trial Domain (shown below) to create a trial domain before proceeding with the remaining steps. Trial domains include five preconfigured integration licenses by default, allowing the integration to be used immediately after installation and configuration are complete.
- If an active Egnyte domain is already available:
- Go to the Egnyte Domain Configuration section. Click Edit to continue.
- Enter the Egnyte domain name in the Egnyte Domain field. Use the complete address without http:// or https://. For example, if the domain is acme enter acme.egnyte.com. Leave the other settings as they are. Click Save.
-
The Egnyte domain login screen will be displayed. Use admin credentials to sign in to Egnyte.
- The admin account must use Egnyte or AD authentication.
- Using an admin account that authenticates with a Single Sign-On provider will not work.
After successfully authenticating, the user will be brought back to Salesforce and asked to click Continue to complete the setup of the integration. Do NOT click on continue as this time.
If this screen is not displayed, it's because the user used an admin account that was using SSO. In this case, the integration will not complete successfully, and the user will need to repeat with an admin account that uses Egnyte or AD authentication.
- Go to the Egnyte Domain Configuration section. Click Edit to continue.
-
Copy the domain URL from the browser window for use in the Remote Site Settings configuration section. The URL begins with https://efs (for example, https://efs.na17.visual.force.com/....). Only the domain name is required; any portion of the URL following the domain name can be omitted. Click on Continue once the URL is copied.
The URL can only be copied when in Classic view.
- Click Remote Site Settings to open a new tab and add a Remote Site Setting to the Salesforce org. Set the Remote Site Name to EgnytePackage (or any unique name without spaces) and the Remote Site URL to the domain URL copied during step 3. Ensure the Active checkbox is selected and click Save and New to enter another Remote Site setting.
- Add the Egnyte domain to Remote Site Settings. Set Remote Site Name to Egnyte Domain (or any unique name without spaces) and Remote Site URL to the Egnyte domain URL — for example, https://acme.egnyte.com.
- Ensure the Active checkbox is selected and click Save.
-
Test the connection by clicking on My Egnyte button.
If a page not found error is displayed, it might be due to some information being removed from the login URL. This happens on Chrome and Internet Explorer due to caching that is performed by the browsers. If this does happen, try again using an Incognito window in Chrome or a different browser like Firefox or Safari.If the password on the Admin account that is used to complete setup changes, the user will need to run through steps 1-7 again to re-generate a new access token for the integration.
Add the Egnyte for Salesforce App to Page Layouts
The steps described below apply to organizations where Salesforce Classic UI is used. For organizations where Lightning Experience is used, refer to the section on how to set up the integration for Salesforce Lightning in the Egnyte for Salesforce Administrator’s Guide.
- To add Egnyte to any object’s page layout, go to the Page Layouts configuration for that object in Salesforce (for example, Setup > Build > Customize > Accounts > Page Layouts).
- Choose the Page Layout to modify and click Edit. Drag the Egnyte for Salesforce Canvas App into the layout. Place it in a single-column section for best results.
- The recommended height for the Egnyte for Salesforce canvas app is at least 500px — or 600px if users are granted Owner access (configured in the Default Permission section of the Egnyte Domain Configuration tab), ensuring the full folder permission dialog is visible. Set the width to 100% and enable Show Scrollbars.
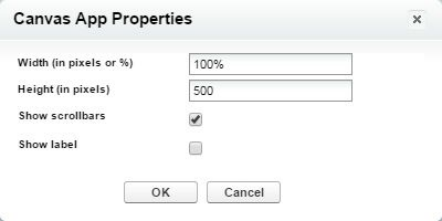
- Click Save to save the page layout, then open a record. The Egnyte UI appears as an embedded widget on the record page, where files can be uploaded and shared.
For Releases 2.6.1 and higher
Package 2.6.1 contains a security upgrade to stop Egnyte sessions from being automatically created when an admin impersonates a user in Salesforce. In version 2.6.1 and above, admins can set up the integration in such a way that session creation does not automatically happen when the canvas app loads, so an Egnyte session is not created when an admin impersonates a user.
To activate this feature, one additional step is required. The process is shown below.
- Install the Package.
- Create a Visualforce Page (repeat steps 2-4 for each object that the integration needs to be enabled on).
-
In the Visualforce page add the following markup (replace the part in blue with the API name of the object and the part in green with the desired height for the Egnyte window - a minimum of 600px is recommended):
<apex:page standardController="ObjectName">
<efs:egnyteload recordId="{!Id}" pageHeight="600px"/>
</apex:page> - Add the Visual Force page to the page layout for the respective object.
For Releases 2.6.3 and higher
Folder permissions can also be controlled and customized at the record level on the VF page using the snippet below.
<efs:egnyteload recordId="{!Id}" pageHeight="500px" permission="PermissionLevel"/>
</apex:page>
Example:
<efs:egnyteload recordId="{!Id}" pageHeight="500px" permission="Viewer"/>
</apex:page>
Here are the permission assign cases :
- If any permission (Among Viewer , Editor , Full , Owner) is defined in VF Page then it will assign these permissions to the loaded record, overriding the default permissions in Egnyte Domain Configuration.
Note: Permission names are case insensitive. - If no permission is defined on the VF page (Or the permission parameter is empty) then it will use the default permission set in the Egnyte Domain Configuration.
- If an invalid value (like 'fdsfsdf') is provided as permission parameters in the VF page then default permission in Egnyte Domain Configuration will be used.
More Options to Configure Egnyte for Salesforce
For additional configuration options, refer to the following guides: