Note: Standard Users cannot sign in using SSO. Only Power Users and Administrators can use SSO authentication
An overview of the process of configuring Egnyte for Single Sign-On:
1. Verify that the Egnyte account provides SSO. Create Egnyte user accounts. You must also enable the user accounts for Web SSO.
2. Configure Egnyte for SSO with SAML.
3. Configure the application settings in Cloud Manager: - Configure the Egnyte
web application in Cloud Manager. Here you specify some of the settings you specified
in the web application directly.
Setup Centrify for Egnyte:
To add and configure the Egnyte application in Centrify Cloud Manager
1. Navigate to Centrify Website and login. Go to Apps --> Add Web Apps apps
2. On the Search tab, enter the partial or full application name (egnyte) in the search field and click the search icon.

3. Select the first Egnyte application, where the SAML and Provisioning options are shown.
Click Yes to add the Egnyte application.

4. Next to the application, click Add.
5. In the Add Web App screen, click Yes to confirm. Cloud Manager adds the application.
6. Click Close to exit the Application Catalog.
The application that you just added opens to the Application Settings page.
7. The Application settings page is the one from where you will pick up the parameters to be entered on the Egnyte Web Portal for configuring SSO.

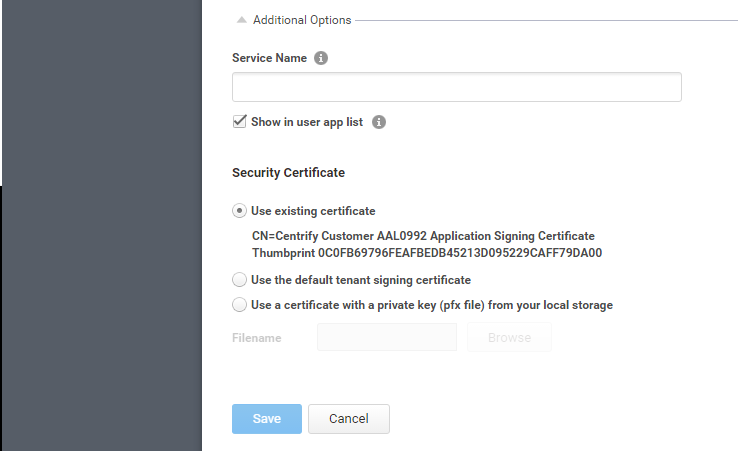
8. On the Application Settings page, expand the Additional Options section and specify the following settings:

a. Select Show in User app list to display this web application in the user portal. (This option is selected by default.)
b. Security Certificate: - These settings specify the signing certificate used for secure SSO authentication between the cloud service and the web application. Just
be sure to use a matching certificate both in the application settings in the Cloud Manager and in the application itself.
Select an option to change the signing certificate.
• Use existing certificate
When selected the certificate currently in use is displayed. It’s not necessary to select this option—it’s present to display the current certificate in use.
• Use the default tenant signing certificate
Select this option to use the cloud service standard certificate. This is the default setting.
• Use a certificate with a private key (pfx file) from your local storage
Select this option to use your organization’s own certificate. To use your own certificate, you must click Browse to upload an archive file (.p12 or .pfx extension) that contains the certificate along with its private key. If the file has a password, you must enter it when prompted.
Upload the certificate from your local storage.
9. Hit Save.
10. On the User Access page, select the role(s) that represent the users and groups that have access to the application.

When assigning an application to a role, select either Automatic Install or Optional
Install:
- Select Automatic Install for applications that you want to appear automatically for
users.
- If you select Optional Install, the application doesn’t automatically appear in the
user portal and users have the option to add the application.
11. On the Account Mapping page, configure how the login information is mapped to the application’s user accounts. If provisioning is enabled for this application, then the account mapping is not available.

If user provisioning is not enabled, then you can use the following: -
- Use the following Directory Service field to supply the user name: Use this option if the user accounts are based on user attributes. For example, specify an Active Directory field such as mail or userPrincipalName or a similar field from the Centrify cloud directory.
- Everybody shares a single user name: Use this option if you want to share access to an account but not share the user name and password. For example, some people share an application developer account.
- Use Account Mapping Script: You can customize the user account mapping here by supplying a custom JavaScript script. For example, you could use the following line as a script:
LoginUser.Username = LoginUser.Get('mail')+'.ad';
The above script instructs the cloud service to set the login user name to the user’s mail attribute value in Active Directory and add ‘.ad’ to the end. So, if the user’s mail attribute value is Adele.Darwin@acme.com then the cloud service uses Adele.Darwin@acme.com.ad.
12. Click Save.
13. Users can be added or bulk imported from the Users tab on your Centrify Cloud Manager.

To configure Egnyte for SSO:
1. Log into your Egnyte account through the Web UI.
2. Navigate to "Settings" --> "Security & Authentication" --> "SSO".
3. Select "SAML 2.0 (SS0)" in the dropdown menu.
4. Identity Provider: Choose Centrify in the dropdown.
5. Identity Provider Login URL: From Step 7 of Setup Centrify for Egnyte.
6. Identity Provider entity ID: From Step 7 of Setup Centrify for Egnyte.
7. Identity Provider: From Step 7 of Setup Centrify for Egnyte.

8. Click on Save.
9. Log out of your Egnyte account.
Users must manually refresh the page after configuring SSO details in Egnyte.
Importing Users:
1. Log into Egnyte through the Web UI. Navigate to "Settings" --> "Users & Groups" --> "Power Users".
2. Click the "Import" button.
3. In the import dialog, click on "Download Sample File" to download the sample user provisioning CSV file.

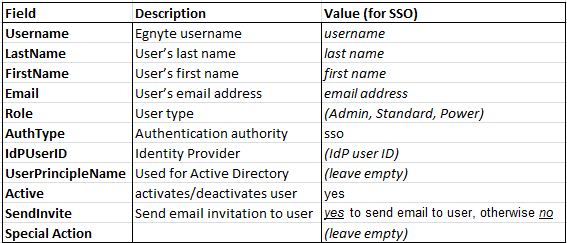
4. Open the downloaded CSV file in Microsoft Excel and fill out the columns with the following values:

Here's an example of how it will look in Microsoft Excel:

Note: Periods, underscores, and hyphens can be placed in usernames; however, usernames cannot begin with these symbols nor can a username end with a period.
5. Save the file in CSV format.
6. Upload the File to Egnyte by clicking on "Choose File" in the "Import Users" dialog and selecting the file you just saved.
7. If you are using the spreadsheet to create new employee accounts in Egnyte, select the checkbox "Allow the creation of new users". If your employees already have accounts in Egnyte and you are now allowing them to have SSO access, select "Allow updating of existing users". When updating existing employees, you will only need to complete the Username, AuthType, and ldpUserID columns; the rest can be left blank.
8. Click "Import" and wait for the confirmation email that indicates your user import has been completed.
9. Test the setup by logging out of your Egnyte account. You should be directed to your SSO provider page. Login. You should see the Egnyte icon to login to your Egnyte Web Interface.