This guide will walk you through how to set up SSO for Egnyte using OneLogin and how to import users from OneLogin to Egnyte.
Skip Ahead to...
Set Up OneLogin for Egnyte
Configure Egnyte Settings
Import Your Users
Set Up OneLogin for Egnyte
1. Navigate to the OneLogin website and log in. Go to "Apps" --> "Add App" --> "Find apps"
2. Enter "Egnyte" in the search box; then click on "Add".

3. In the “Configuration” page, choose the “SAML 2.0” option for the "Connector Version" setting and click “Save”.
4. In the "Configuration" tab, enter your Egnyte domain name. Click “Save”.
For example, if your account domain is acme.egnyte.com, enter only acme.
5. In the "Parameters" tab, find the "Credentials are" setting and choose "Configured by admin".
6. When configuring Egnyte SAML Settings in the next section, you will need the SAML Issuer URL and the SAML 2.0 Endpoint URL. You may want to copy & save these now so you can paste them in later.

7. Click Save on the OneLogin website.
8. When configuring Egnyte settings in the next section, you will need to Oauth with the Egnyte API from OneLogin. Navigate to "Configuration" -> "API Connection" and click on "Authenticate".

9. Click on the Egnyte link in the popup to start the auth flow.

10. Allow OneLogin access to your domain account.
11. When configuring Egnyte settings in the next section, you will also need to enter your SAML certificate. To locate your certificate, navigate to "SSO" -> "SAML2.0" and click on "View Details" to open up the certificate window.
12. Copy your SAML certificate from the "x.509 Certificate" field. Do NOT include ----BEGIN CERTIFICATE---- and ----END CERTIFICATE----. You will need this to configure Egnyte settings in the next section.
Configure Egnyte Settings
1. Log into your Egnyte administrator account through the Web UI <yourdomain.egnyte.com>.
2. Navigate to "Settings" -> (1) Configuration -> (2) "Security & Authentication" -> scroll all the way down to find "Single Sign-on Authentication"Select "SAML 2.0" in the dropdown menu.
4. Identity Provider (ldP) Name: Choose “OneLogin” in the dropdown.
5. ldP Login URL: SAML 2.0 Endpoint URL (from Step 6 under Setup OneLogin for Egnyte)
6. ldP entity ID: SAML Issuer Login URL (from Step 6 under Setup OneLogin for Egnyte)
7. SAML Certificate: Certificate (from Step 11 under Setup OneLogin for Egnyte)
8. Click on Save.
Users must manually refresh the page after configuring SSO details in Egnyte.
Import Your Users
1. Log into Egnyte through the Web UI. Navigate to "Settings" --> "Users & Groups" --> "Power Users".
2. Click the "Import Users" button.
3. In the import dialog, click on "Download Sample File" to download the sample user provisioning CSV file.
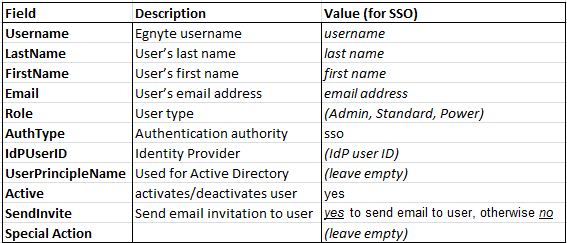
4. Open the downloaded CSV file in Microsoft Excel and fill out the columns with the following values:

Here's an example of how it will look in Microsoft Excel:

Periods, underscores, and hyphens can be placed in usernames; however, usernames cannot begin with these symbols nor can a username end with a period.
5. Save the file in CSV format.
6. Upload the File to Egnyte by clicking on "Choose File" in the "Import Users" dialog and selecting the file you just saved.
7. If you are using the spreadsheet to create new employee accounts in Egnyte, (1) select the checkbox "Allow the creation of new users". If your employees already have accounts in Egnyte and you are now allowing them to have SSO access, (2) select "Allow updating of existing users".
When updating existing employees, you will only need to complete the Username, AuthType, and ldpUserID columns; the rest can be left blank.
8. Click "Import" and wait for the confirmation email that indicates your user import has been completed.
9. Test the setup by logging out of your Egnyte account. You should now see a different login page that now includes a single sign-on option on the right. Click "Login" and you should be redirected to your SSO provider. Log in. You should be redirected to your Egnyte domain.
When provisioning users from OneLogin to Egnyte, if the user already exists in Egnyte then make sure that the user's e-mail address in Egnyte is in lowercase. Failing to do so will reprovision the user as a new user thereby removing their access to Egnyte.